california rafting trips & vacations

South Fork American 1/2 Day PM Gorge Run

North Fork American River is a GO this Spring

Plan Your 2024 Vacation

Standard Operating Procedures

Tributary Whitewater Tours

Standard Operating Procedures (SOPs)

All Trips

All trips must include a trip pack, a pre-trip guide meeting, a safety talk, a paddle talk per boat, a trip unpack, and a guide de-brief.

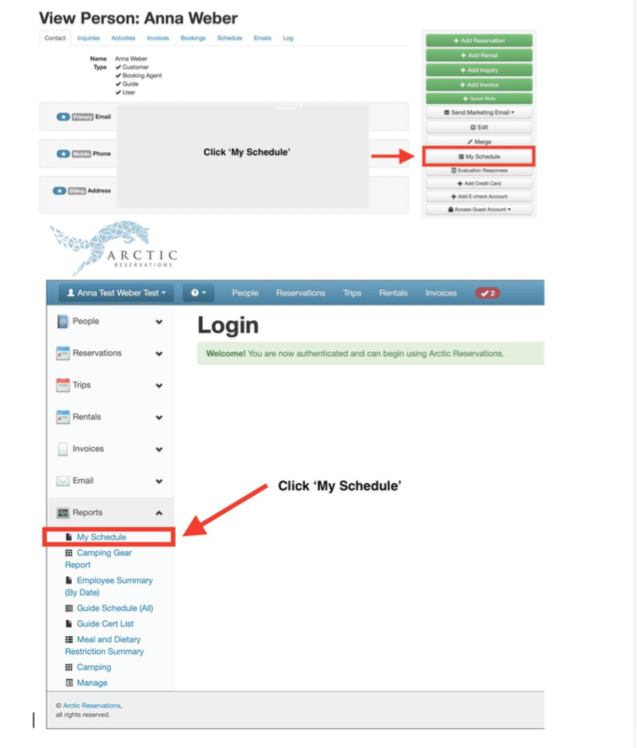
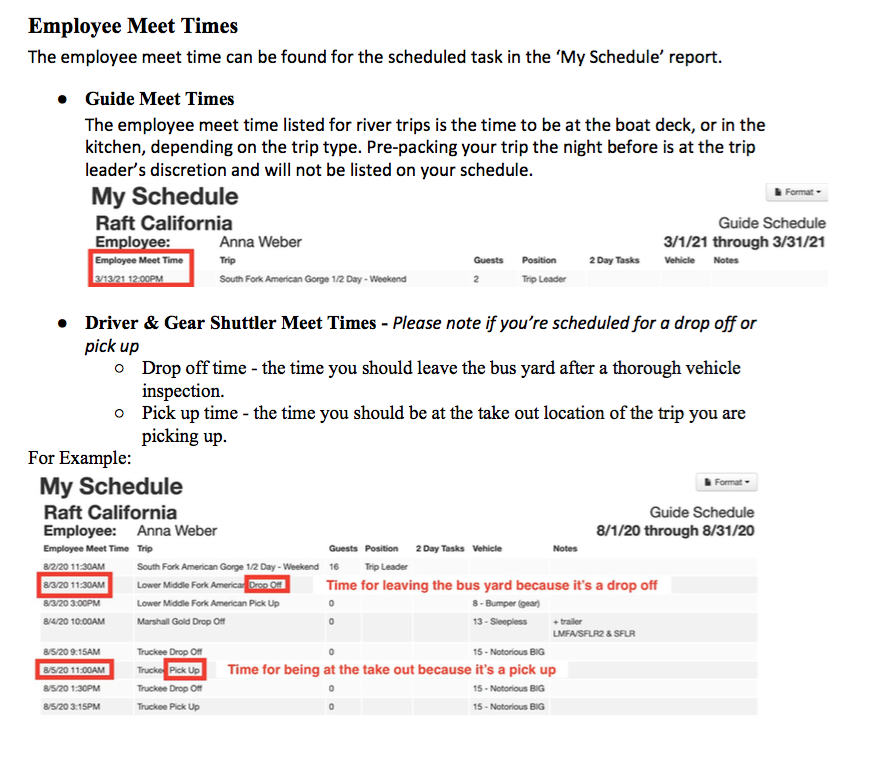
The meet time and location for each trip is available via Arctic. If you are unsure on how to find that information within Arctic please follow these guides:

Arctic will designate where to meet 

Camp Kitchen

  1. SF 2-Day
  2. MF Wilderness
  3. SF American/ MF American 2-Day
  4. Lower MF/ SF American 2-Day

Small Deck

  1. SF Full River
  2. SF Upper
  3. SF Lower

Big Deck

  1. MF 1-Day
  2. Lower MF
  3. N Yuba
  4. NF American
  5. Cal. Salmon
  6. Trinity
  7. Kaweah
  8. Lower Klamath 
  9. Upper Klamath 
  10. EF Carson

Truckee Outpost

  1. Truckee AM 
  2. Truckee PM

Deschutes 

  1. Work in Progress (WIP)- Oregon information coming soon

It is the morning of your trip and you head to the boat deck with all of your PG to start your trip. It is critical to be on time, or even a bit early, to ensure you are involved in all aspects packing for your rafting trip. You are expected to be present and ready to work by your designated meet time. Prior to showing up to pack your trip you should know how many guests are scheduled for your trip and how many guides will be on your trip, in order to know the quantities of equipment that is needed. Most of the time the trip leader (TL) or equipment manager (EQ) will have the amount of paddles, boats (how many and which ones), throwbags, PFDs (amount of adult vs. youth), helmets, and other equipment listed on the white board to guide the trip pack. The TL or EQ will also know which vehicles and trailers are needed. It is important to work slowly and cautiously while communicating with fellow guides because lifting rafts and other equipment on and off of vans and trailers can be dangerous, when done incorrectly. It is also critical to be thorough because it is incredibly embarrassing and unprofessional to forget necessary equipment. A smooth and thorough trip pack is a fantastic way to start a trip!

Items to be completed during the packing of a trip:

  1. Turn on generator, plug zinger into generator. Always make sure the generator exhaust is facing away from all rafts. It can cause serious damage to rafts. 
  2. Inflate rafts, replace all valve caps when done.
  3. Put the generator and zinger neatly away in the boat shed. 
  4. Load one raft onto a van or trailer to hold other trip equipment, with the logos facing forward.
  5. Count paddles and load into the bottom boat on the van or trailer.
  6. Pack oars (if needed) and load into the bottom boat on the van or trailer.
  7. Count throwbags and load into the bottom boat on the van or trailer.
  8. Load all other rafts onto designated vehicle or trailer. We take pride in our boat stacks. All rafts should be stacked with the logos facing forward and stacked neatly and in decreasing raft size order. 
  9. STRAP DOWN RAFTS!
  10. Pack stern frame kits (if needed), strap onto the boat stack. 
  11. Load 1-2 barrel pumps per trip into the back of the van.
  12. Pack sweep kit items into designated bags of the sweep kit. Roll and close sweep kit drybags carefully and diligently. 
    1. Red bag (always goes into the vehicle with the TL transporting guests). 
      1. First aid kit
      2. Raft repair kit
      3. K-pump
    2. Grey Bag (can go into the bottom raft in the stack). 
      1. Wrap kit
      2. Spare PFD
      3. Spare Helmet
  13. For trips out of the Big Deck
    1. Count PFDs and place into bags or bundles.
    2. Count helmets and place into bags. 
    3. Pack any wetsuits and splash tops based on guest sizing (found in the trip roster within Arctic) and pack into bag.
    4. Any bags or bundles of gear can be strapped into the top boat of the stack. 
  14. Double check gear list to make sure you have not forgotten anything.
  • A critical step before getting on the water for any trip, is the pre-trip all guide meeting. This is typically done after all guests have arrived and are checked in, and is led by the TL. This is the time for the guide staff on that trip to get on the same page. Not only does this ensure we run the safest trip possible but it also allows for a smoother trip. 

    Items to be discussed during the pre-trip meeting:

    1. How many guests are on the trip?
    2. How many guides are on the trip?
    3. How many boats are on the trip?
    4. Which guide will be the lead boat/ boat order.
    5. Which guide will have each bag of the sweep kit. 
    6. Take-out logistics
    7. Any pertinent information regarding customers.

The safety orientation presented to each set of guests prior to their river trip includes the most important safety topics pertaining to their trip. This safety briefing is typically presented by the trip leader. It is critical to present all of the information in a manner that is understood by the guests. It typically lasts 5-10 minutes and is common to lose guest’s attention mid-way through the presentation, so finding ways to make it interactive and engaging is critical. It is also common for guests to be slightly frightened following the safety talk. Adding bits to keep the safety talk light and informational lead to a smoother trip, and ultimately a better guest experience. 

Items to be discussed during the safety talk:


  1. Introduction to river
    1. Welcome to the ___ river
    2. Introduce yourself
    3. Introduce option for questions
    4. Guide is in charge always listen to guide
    5. Never meant to scare you away from rafting rather to inform you how to handle situations if they happen 
    6. Thank them for coming rafting with Raft California/Raft Oregon  
  2. Equipment 
    1. Helmets-well adjusted cannot wiggle side-to-side on the head
    2. PFD (personal floatation device)- snug and adjusted should not be able to pull above the head
    3. Paddles- blade vs. shaft vs. T-grip. Always covering T-grip with hand while in the boat
  3. On land
    1. Practice caution when walking to/from boats, while on land, or at lunch
    2. Slippery rocks
    3. Dangerous plants and bugs
    4. Snakes
  4. In the boat
    1. Hold onto T-grip, be aware of where they are in the boat in relation to others
    2. Use caution when splashing people using paddles
    3. How to pull someone into the boat, by the shoulder straps of PFDs not by arms. 


  1. In the water
    1. Steps of swimming
      1. Stay calm 
      2. Assess situation/ look around for a guide  
      3. Get back to a boat 
    2. Offensive vs. defensive swimming
    3. Swimmers are active participants in their own self rescue 
    4. NEVER STAND UP IN THE RIVER, explain why (foot entrapment) and what can happen
    5. Pointing positive 
    6. Perimeter line and it’s uses
    7. T-grip as extension of reach
    8. If you end up underneath boat, how to walk hand-over-hand to the surface
  2. Flipped boats
    1. How to get out from underneath a flipped boat, why it’s important 
    2. Swim back to upright boat if it’s available to you
    3. Follow guide instructions 
  3. Throw bags
    1. Explain the risk of throw bags, used only as last resort tool
    2. Getting swimmers attention before throw
    3. Swim to rope if the thrower misses
    4. Grab the rope not the bag
    5. Never wrap the rope around a hand or any other body part 
    6. Put rope over shoulder and turn back towards whoever threw you the rope 
  4. Closing statements 
    1. Inform guide of any medical conditions 
    2. Inform guide of any allergies
    3. Any questions?
    4. Break up into groups 
    5. At this point of the safety talk I like to offer the clients the option to opt out as I feel they can now make an informed decision, we have other easier rivers and we have a driver standing by. 

The paddle talk is to be presented to each boat of guests by their river guide. A well developed paddle talk should convey all of the information the guests will need to help you, as the guide, effectively maneuver the raft downstream. This is typically done while the boat is still on shore, yet some components of this talk can be discussed while the boat is in the water and all the guests have loaded into the raft. 

Guests’ paddle performance is directly related to the quality of the paddle talk presented  to them by their guide. The more thorough, relatable, and understandable you are the better your crew will perform. This will ultimately lead to a smoother trip with a higher level of an experience for guests. Please take this time to reach out to your guests in a way that will help them get to know you as a guide. You should be able to complete your paddle talk in around five minutes. 

Items to be discussed during the paddle talk:

  1. Guide introductions
  2. Guest introductions
  3. Any medical pertinent medical conditions/allergies?
  4. Introduce guests to the raft.
  5. Demonstrate how to sit in the raft.
  6. Demonstrate how to tuck their feet into the raft.
  7. Show them where they can stow their water bottles or other loose items.
  8. Guide guests on where you would like them to sit in the raft.
  9. Recap key points from the safety talk.
  10. Introduce the paddle commands you will be using with them.
  11. Demonstrate the proper way to hold their paddle and perform paddle strokes.
  12. Help guests load the raft carefully.
  13. Practice, practice, practice. 

Please allow guides on your trip enough time (around 15 minutes) to say goodbye to guests prior to unpacking the trip, or please be considerate of fellow guides if you want to hang out with your guests following the trip. 

While it might feel like your job is done once you have said goodbye to your guests, unpacking trip gear is an overlooked part of the day. It is important to do all steps correctly, thoroughly, and cautiously to ensure all of the gear is stored in a way that you would like to find it the next time you walk up to the boat deck to pack a trip. It is also important to work slowly and cautiously while communicating with fellow guides because lifting rafts and other equipment off of vans and trailers can be dangerous, when done incorrectly. Please take the time it takes to do these steps correctly. If you fail to finish all tasks of the trip unpack your trip will be considered incomplete.

Items to be completed during the unpack of a trip:

  1. Unstrap rafts from vehicles.
  2. Replace straps back onto the roof rack of the van, or onto trailer tie downs. When replacing straps to trailers we always make sure the loose end of the strap is behind the wheel of the trailer and daisy-chained in a neat fashion. 
  3. Stack rafts onto boat decks with the other like sized and make rafts, in the correct direction with logos facing forwards. ie. 15’ Aire with 15’Aire. 
  4. De-top rafts.
  5. Unload paddles into paddle bins, place any oars into their designated location. 
  6. Place any stern frames in their designated location
  7. Unpack the sweep kit.
    1. A correctly unpacked sweep kit means all items removed from both the red and grey bag, all of the contents of those bags placed in their designated cubby with the red and grey bags neatly hung below.
  8. Hang throw bags onto hooks.
  9. Wrap pumps neatly and stow in their designated area.
  10. Remove any roll-a-tables from dry bags and stow in their designated area.
  11. Clean out vans!
    1. Remove all PG.
    2. Throw away any trash.
    3. Make sure there is not any company gear hiding under seats, or in the back of the van. 
  12. If any gear is damaged please set aside and note its damages on the gear using tape. Inform TL to mention in their post-trip report. 
  13. Remove all PG from the boat deck
  14. Park all vehicles, and trailers into their designated locations.
  15. Guide debrief

After the trip is unpacked, the last step is for all of the guides on the trip to group up in order to debrief and discuss the day. Similar to the pre-trip meeting this debrief will be led by the TL to discuss what went well during the trip, and what could have been executed better. Tributary Whitewater Tours is continuously striving to better our company and our guides, and there is no better way to achieve that goal than by politely discussing how we can improve as a whole. This is not the time to degrade co-workers, rather a time for constructive feedback. 

Items to be discussed and completed during the pre-trip meeting:

  1. How was the spacing between boats?
  2. How was our speed moving downstream?
  3. Any swimmers?
  4. Any incidents?
  5. How smooth and efficient were we at take out?
  6. Was each guide being a team player in running safety for other boats?
  7. Any information a TL needs to convey in the post trip report. 
  8. Was any company equipment lost or damaged?
  9. Post-trip report filled out by the TL
  10.  All guides will fill out their time cards for the day

All trip leaders must complete the following tasks to ensure that you will be compensated for the additional pay for each trip. It is your responsibility as the trip leader that all tasks are either done by you or delegated accordingly to the other guides to ensure a perfect trip. The following tasks and responsibilities necessary for each trip include:

  1. Meet with your guides at the beginning of the trip to inform them of expected put-in times, take-out times, equipment necessary for packing and unloading, medical conditions of our guests, specific take-out procedures, expected pace for the trip, assign sweep boat, etc.
  2. If an equipment manager (EQ) is designated for a trip of 5 boats or more, it must be noted on the trip report for that person to receive additional payment. 
    1. Do not take advantage of this role (EX. Should not be used on a 2 boat trip)
  3. Arrive at the guest meeting location :30 before official guest meet time. Greet and check in all guests and make sure that every guest has read and completed their waiver. Please note that we need one waiver per participant (not one signature/waiver per household). Try and have the guests fill out their digital waiver on Arctic, before using paper, if they haven’t completed one before the official guest meet time.
  4. The trip leader is required to ride in the vehicle with the guests to put in and take out. If there are more than one vehicle with guests, assign another guide to ride in that vehicle.
  5. Guides riding in ‘people movers’ should engage with the guests and give a thorough thank you speech at the end of the trip.
  6. Fill out a paper trip ticket (if necessary) for every trip and submit in the proper locations.
  7. Make sure that every guest has been given a proper and thorough safety talk before leaving the put in.
  8. If there is an injury during the trip an incident report must be filled out and submitted with trip paperwork immediately after the trip.
  9.  Properly record your trip report into Arctic immediately after the trip, during the guide debrief. 
    1. Trip reports that haven’t been filled out and trip tickets that haven’t been submitted by 3 days after the last day of the trip will forfeit your trip leader pay. 
  10. Allow time during guide debrief for guides to fill out their ADP Timecards
  11. Make sure that all necessary equipment has been put away so it is ready for the next trip.
  12. Make sure that the kitchen gets cleaned after every use and that dishes are put away. This includes trash and recycling.
  13. General inspection of cleanliness of camp, boat shed, boat deck, and bathrooms.
    Debrief with guides at the end of each trip to discuss the good and any room for improvement. Invite a manager to attend if necessary.

 If an incident occurred on the trip, and the first aid kit was used, the first aid kit needs to be resupplied and sealed with a new zip tie.

TLs are responsible for the documentation of the trip. This includes: the post-trip report, ensuring all waivers are filled out, and the trip ticket (if applicable) is filled out and dropped off. 

Trip Tickets (Middle Fork and North Fork American) 

Trip tickets need to be filled out completely and properly, including put-in and take-out times. The top copy (blue) needs to be turned in on the day of the trip to the ranger box at put-it, or handed to a ranger directly. The bottom two copies (yellow and pink) can be left in the guide paperwork folder in the van you used

It is critical that the numbers submitted on the trip ticket match the numbers the TL enters into their Post-trip report. Any guides training on that section of river must be counted as trainees, any friends that add to the trip can be counted as guests. 

Upper Middle Fork:

  1. Put in: Oxbow
  2. Take Out: Greenwood Creek

Lower Middle Fork:

  1. Put in: Greenwood Creek
  2. Take out: Mammoth Bar

Nork Fork American:

  1. Put in: Mineral Bar
  2. Take out: Ponderosa
  3. Please include the gauge height on the NF bridge at put-in. 

Post-trip Reports

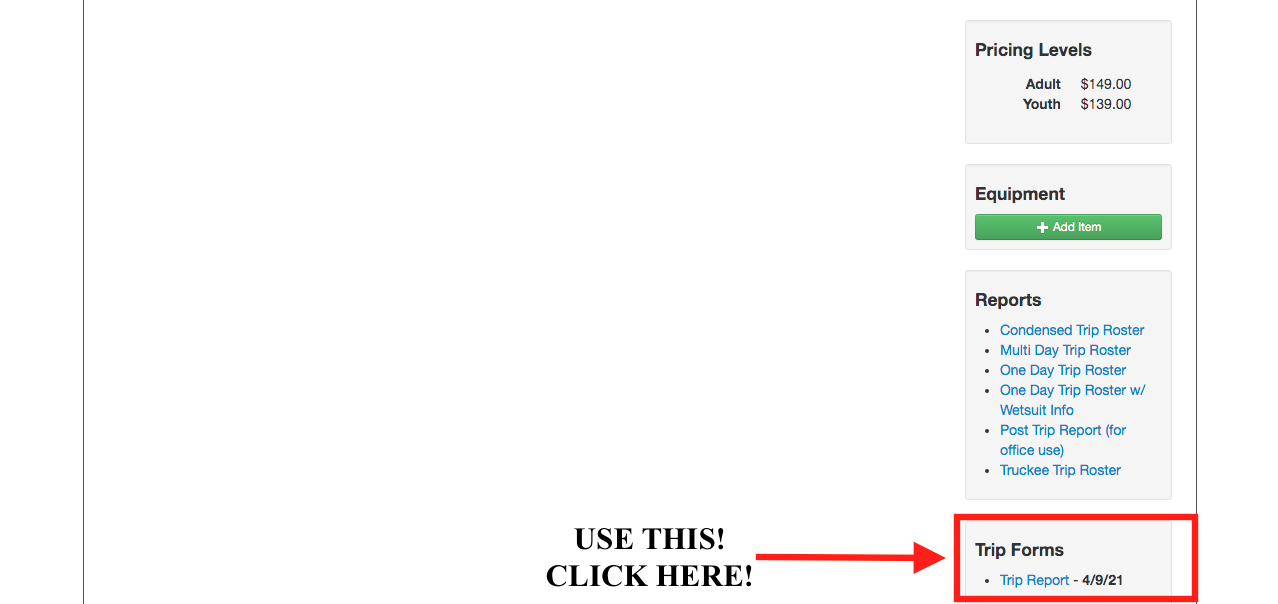
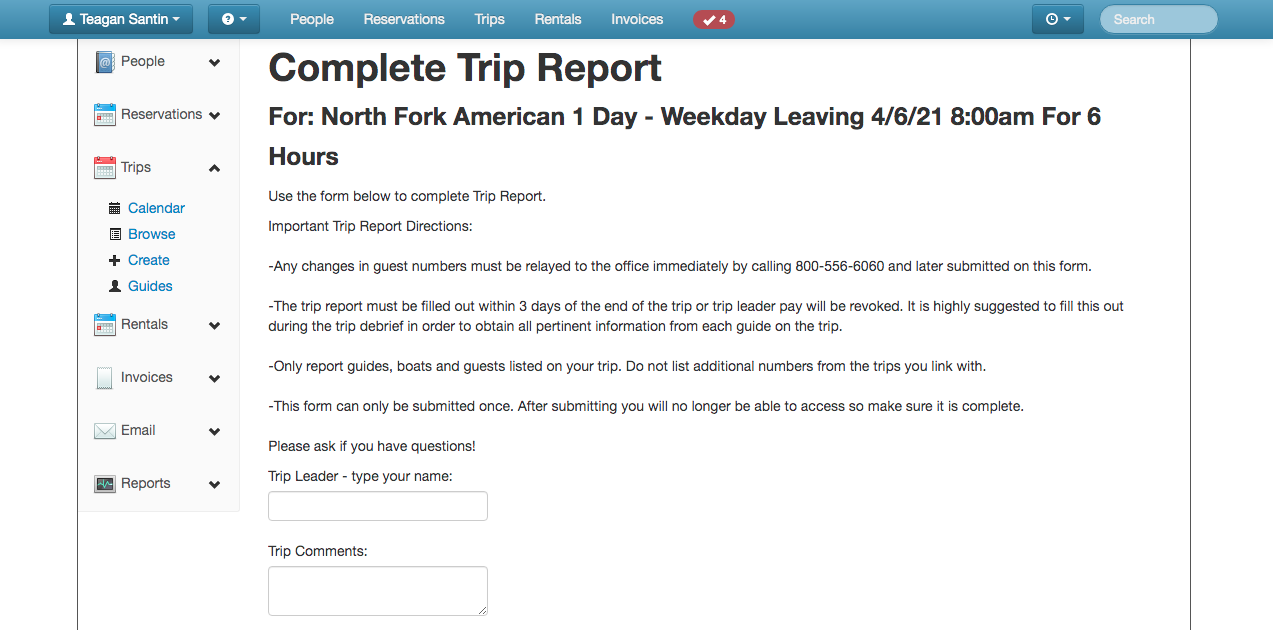
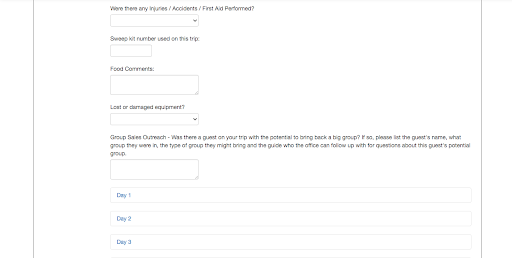
Please take the time to familiarize yourself with the new trip report. 

  1. It can only be submitted once
  2. It is self-explanatory and user-friendly
  3. Middle Fork/North Fork: It is critical for the numbers entered into the Post-trip report to match the numbers submitted on the trip ticket. 

Incident Reports

Any time the first aid kit is opened, an incident report must be filled out. Incident reports are found in the document file boxes/folders in Big Deck Shed, Small Deck Shed, and vehicles. These need to be filled out with the customer, and given to the Manager on Duty (MOD) that day. 

Paper Waivers

The goal is for all waivers to be submitted by guests before they arrive for their trip. However, there will be times where paper waivers are still needed. If you have guests fill out paper waivers on a trip, please leave them in the guide zipper pouch in the van you used.

Oregon Specific Documents

Work in Progress (WIP)- Oregon information coming soon

Check-off Criteria 

Class

II-III

IV

V

Ride-Along

2x

2x

1x or guide boat

Turkey Boat

3x

1x

1x or ride along

Specifics

PFD

Helmet

Knife

Whistle

3-2-1

J-stroke 

Trucker’s Hitch 

All previous items +

Dry bag

Mesh bag

Lunch rig

Throw bag

River specific knowledge 

All previous items +

River specific knowledge 


*All designated check-off guides will be trained on how to use this system to oversee check-off trips.

**The number of trips required to check-off on river sections is determined by guide class level. (Example: if a class V guide is checking off on a new class III section, they will follow the class V check-off criteria, which is 1 guide boat or 1 ride-along).

How to use this?

A ride-along is riding in a raft with a paid guide during a commercial trip. A turkey boat is a boat full of trainees working together to train on a section of river. You must track these trips in your river log and have the TL of the trip, or a check-off guide sign off that they witnessed the completion of that trip.  

If you wish to be scheduled for ride-alongs or wish to tag along with a commercial trip as a turkey boat please reach out to schedule@raftcalifornia.com. Once you have all items completed within the graph and feel ready for a check-off trip please reach out to training@raftcalifornia.com

Printable PDF coming soon!

River/River Section

Flow (cfs)

Date

Trainer Initials 


AED

  1. One AED will permanently live in the Coloma camp kitchen. It can be found in the kitchen shed to the left as you walk in the door. 
  2. One AED is located in Maupin to be packed for wilderness trips. 
  3. The other three AEDs will live in the gear shed next to the footballs (comms kits), to be packed for wilderness trips. 

Unique Raft Identifier

If damage to a raft occurs or you notice damage to a raft on your trip please use this unique identification system to label the raft within the post-trip report. This will help standardize the way we label boats for further clarification. If the boat needs immediate repair please roll in a way the raft identifier is visible.  

Communication Equipment (Comms.)

Multiple river trips we offer require us to carry one of our Somewear devices or radios. The Somewear device will be carried by the TL as well as a charged cell phone. It is the responsibility of the TL to make sure the device is charged and synced to their phone to use in case of emergency. If radios are required, the TL will carry one and leave the other one with a driver. At the end of the day all comms devices must be placed in their designated location in the Big Deck Shed. 

The device will be carried on the following rivers:

  1. MF American
  2. NF American
  3. N Yuba
  4. EF Carson
  5. Upper Klamath
  6. Lower Klamath
  7. Cal. Salmon
  8. Owyhee
  9. Burnt Ranch Gorge 
  10. Scott
  11. Kaweah
  12. Deschutes wilderness trips

Connecting to the Somewear Device 

Prior to using the Somewear device you will need to have the Somewear app downloaded to your smart phone. Turn on Bluetooth on your smartphone. Open Somewear app. Press and hold the power button on the Somewear device for 5 seconds until the white light starts blinking. Press the “Connect Hotspot” button on the app. Once the device is paired you can open a new message by pressing the “+” on the top right of the app screen. Select a person from your contact list and send a message. 

If you need immediate EMS assistance you can trigger the SOS option.

  1. Remove the blue SOS cap from the device. 
  2. Press and hold the “SOS” button on the light blue keypad for 6 seconds, the “Sending SOS” LED indicator will start to blink white. 
  3. Ensure the device is facing the sky. 
  4. When the SOS message has been delivered the “SOS Delivered” LED indicator will turn solid white. 5. If your phone is connected to the Somewear device you can use the app to message emergency responders. When the SOS has been received by GEOS, a new conversation with “Emergency Responders” will appear in your messages tab in the app. 

Two way radios will be used to contact drivers, if necessary, on the following rivers:

  1. MF American 
    1. Below Tunnel Cute: Used if contact with drivers is necessary. If there are not any issues below Tunnel Cute, spin the rafts to send the all clear signal to drivers, no need to radio. 
  2. NF American
    1. At Ponderosa take out: Used to alert drivers when getting close to drive down to pick-up area.

Burger Lunch 

When cooking a burger lunch, please only cook 1 burger per guest and guide, to start. After burgers have been served, take an order for who might want a second burger.  

2-day Trip Specific SOPs

Our camp kitchen is the common hub for 2-day trips as it is where we provide meals to our guests throughout their trip. It is critical to keep this area clean, sanitized, and organized. The following SOPs will help to guide you through providing the best food experience for our guests.  

  1. Wash hands
  2. Put on face covering
  3. Sanitize surfaces
  4. Wash hands 
  5. Prepare food
  6. Any tupperware from the commissary can be placed directly back into the cooler. Snap lids closed and place back into the cooler, no need to wash them!
  7. Clean-up
    1. Place all leftovers into bags, and tag with the date. 
    2. Pack the cooler back neatly! Close all condiment lids, and make sure all tupperware containers are snapped closed.
    3. Please organize coolers into 1 cold food cooler, and 1 hot food cooler which contains still warm leftover food. 
    4. Do all dishes
    5. Sanitize surfaces
    6. Shut-off propane 
    7. Lock up all alcoholic beverages in the supply shed
    8. After the 2nd day of 2-day is complete, put away all the dishes from the racks.

After every trip out of Camp (SFL,SFU, SFFR, SFW, SF2, Deschutes ½ Day, Deschutes Full Day) bathrooms must be checked to make sure they are clean and presentable. 

This includes:

  1. Take out the trash if it is full
  2. Make sure all paper products are stocked
  3. Wipe down counters
  4. Sanitize high-touch surfaces
  5. Make sure hand soap is stocked
  6. All resupply and cleaning supplies will be stored under the sink in both bathrooms. 

Wilderness trips

Wilderness trips are some of the most coveted trips run by Tributary Whitewater Tours, however there are some extra steps to clean and put away the extra gear that is required for these trips.

Pre Trip

Wilderness trip packing list

  1. Water Jugs  
  2. Trash ammo can
  3. Tables 
    1. Chubby
    2. Skinny
    3. Short
  1. Groover
    1. Bank
    2. Tank
  2. Groover Resupply
  3. Easy-up
  4. Propane tanks (x2)
  5. Stove
  6. Stove stand
  7. Blaster
  8. Hand wash
  9. Hand wash buckets
  10. Dish buckets (x3)
  11. Chairs
  12. Guest sleep kits
  13. Customer dry bags
  14. Bocce ball
  15. Can smash
  16. Water filter
  17. Sand stake
  18. Comm. box
  19. Food
    1. Food cooler
    2. Drink cooler
    3. Dry food boxes
    4. Spice box
    5. Scrub box
      1.  

On wilderness trips we offer sleep kits for guests, these will be premade by the guides while packing the trip. Each kit provides enough sleeping gear for 4 guests. Per 4 guests you will pack 1 sleep kit, and 1 Bills bag per person. 

This sleep kit includes (4 guests):

  1. 1 Bills Bag
  2. 2 dome tents
  3. 4 inflatable sleeping pads

All wilderness trips will pick their food up from the commissary, except for Middle Fork Wilderness and South Fork Wilderness trips. 

  1. MF Wilderness
    1. Food will be delivered to camp with the continental breakfast
  2. SF Wilderness
    1. Food will be delivered to camp with the burger lunch
  3. All other Wilderness Trips 
    1. Guides will head to the commissary office to pick up all of their food during the trip pack.

Post-Trip

Tupperwares from the commissary can be snapped closed and placed directly back into the cooler. No need to wash them. 

  1. California- All lunch and large yeti coolers are to be neatly left inside the walk in fridge inside the commissary. Please remove any label tape from coolers prior to leaving them in the walk-in. 
  2. Oregon- WIP information coming soon
  1. California- When packing spices back into the spice box on the river, please make sure all lids and caps are closed on spices and oils. When packing wet sponges and rags into the scrub box on the river, please make sure everything is packed inside the liner bag. Spice and Scrub boxes are to be opened up to vent and left on the counter of the commissary. 
  2. Oregon-  information coming soon
  3. California- When packing spices back into the spice box on the river, please make sure all lids and caps are closed on spices and oils. When packing wet sponges and rags into the scrub box on the river, please make sure everything is packed inside the liner bag. Spice and Scrub boxes are to be opened up to vent and left on the counter of the commissary. 
  4. Oregon-  information coming soon
  5. California- Dry food boxes can be left in an organized fashion in the hallway in front of the bathrooms leading to the commissary. Please remove all label tape from boxes prior to leaving them in the hallway.
  6. Oregon- information coming soon
  1. California- Water jugs are to be emptied, bleached, and air dried prior to placing them on the shelves in the Big Deck shed. 
  2. Oregon- information coming soon
  1. California- All trash and recycling must be removed from trash ammo cans and placed into the appropriate receptacle. Ammo cans must be washed and scrubbed out and air dried prior to placing them on the shelves in the Big Deck shed.
  2. Oregon- information coming soon
  1. California- Please check gas levels prior to placing propane tanks back on the shelves in the Big Deck Shed. If tanks are empty please place them in ‘empty tank’ area.
  2. Oregon- information coming soon

While it might not be the most glamorous task of the wilderness trip clean-up, groovers must be cleaned after every trip they are used. When done correctly, this is a painless and mess-free task. 

Steps to be taken for a clean groover:

  1. Obtain the goover cleaning box and head towards groover cleaning station
  2. Attach the end of the RV hose to the septic tank, remove RV hose plug from the groover and fit RV hose into the hole on the bank box. 
  3. Remove the small white white plug from the top of the groover lid, and attach hose to the top of the groover lid 
  4. Turn on the hose and allow water to flush through the system until the water runs clear through the RV hose. It may be necessary to loosen the contents of the groover by shaking the system, before you do this it is important to turn off the hose, remove the hose, and replace the small white lid. After the contents are loosened, refit the hose to the lid and continue flushing with water. 
  5. Once the water is running clear through the hose, turn the water off, remove the lid from the bank, and add a cleaning solution to properly sanitize the tank. Replace the lid to the bank and flush the cleaning solution out of the tank. 
  6. Prior to removing the RV hose from the groover, please make sure all of the contents are drained out of the hose and into the septic tank. 
  7. Remove hose from septic tank and replace lid to septic tank.
  8. Wrap RV hose back into the supply box with the open ends facing upwards.
  9. Use the cleaning solution to sanitize the toilet seat, toilet lid, groover supply ammo can, and the outer case of the groover. 
  10. Replace all lids and caps to the groover and double check to ensure they are fit tightly. 
  11. Restock groover supply ammo can. 
  12. Coil hose neatly, and make sure water is turned all the way off. 
  13. Replace groover, groover supply, and groover cleaning box to their shelves in the Big Deck shed.

The commissary box must be thoroughly cleaned out using the sink on the Big Deck following every use. Please be diligent with this process, as it is frustrating to open a dirty comm. box. 

Items to be completed for a clean comm. box:

  1. Wash every dish
  2. Wash all utensils 
  3. Remove all trash
  4. Remove any leftover food
  5. Remove tupperware belonging to the commissary
  6. Remove any lunch dishes that belong to commissary 
  7. Remove soap and COVID supply
  8. Restock aprons at the office
    1. Place aprons in dirty laundry
    2. Replace with clean aprons 
  9. Wipe down tablecloths
  10. Resupply paper towels
  11. Resupply ziplocks
  12. Resupply foil
  13. Wipe out box if necessary 
  14. Scrub partner stoves 
  15. Check comm. supply list to make sure you have all items that belong in the box and no extra items.